Install Fedora 20 using Netinstall
This is the procedure for installing Fedora 20 using NetInstall method. For full installation of Fedora 20 on a computer, please refer to Installation Guide for Fedora 20. For installation of Fedora 20 on virtual machine, please refer to Install Fedora 20 on VirtualBox with Guest Additions. For Compiz fan, please refer to the post Install Mate Desktop with Compiz on Fedora 20.
This method allows you to download and install the latest software package from the repository, there is no need for software update after installation. Please note that it will take longer time for the installation to complete because the installer need to download every single package during installation.
I usually use this method to install minimal Fedora 20 on a virtual machine since it does not take up very much hard disk space and memory.
Creation of Media or Setting Up VirtualBox
For creating a bootable USB, please refer to the official Fedora documentation here. You can also refer to my post here on creating USB drive. For creating of VirtualBox environment please refer to my post mentioned earlier. Depending on what you are installing, the configuration on virtual machine is different depending on the software packages you choose. For minimal install, 1GB of RAM with 4GB disk space is more than enough. The total disk space for minimal install is usually less than 1GB.
Installing Fedora 20
Start your computer. You might need to press extra key at the beginning so that you can boot Fedora 20 Netinstall iso from USB drive. For virtual machine user, just click start. On the start screen, type "I" to install Fedora 20.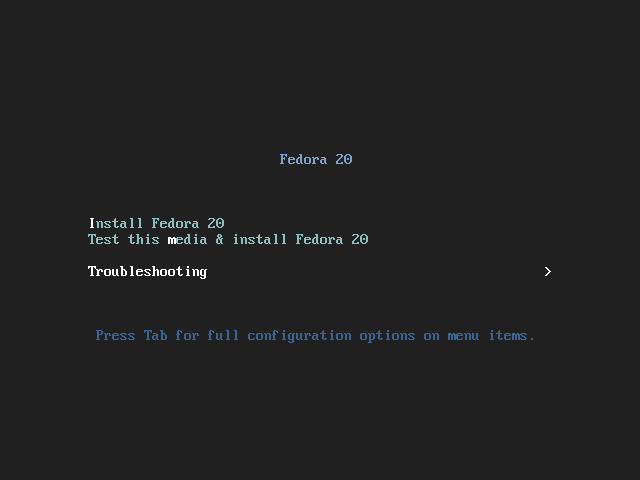
Once you've bootup Fedora 20, it will bring you straight to the installation screen. Select the language. Click "Continue".

On the installation summary, you'll notice that there are warning signs on various item. You need to wait for a while for the installer to configure the software repository and available software.

Once the software repository is configured, there is only one warning sign on INSTALLATION DESTINATION.

Unlike other installation method, net install allows you to choose installation source and software selection. Leave the installation source to the closest mirror. Click SOFTWARE SELECTION.
Under software selection, you have the choice of installing different type of desktop environment or basic desktop. You can also install packages only for servers. Only the right hand side (Add Ons for Selected Environment), you can select additional software packages. In this case, I choose Minimal Install. Click Done when ready.

Please note that you need to confirm the installation target drive. Click on INSTALLATION DESTINATION.
Unlike other installation method, net install allows you to choose installation source and software selection. Leave the installation source to the closest mirror. Click SOFTWARE SELECTION.
Please note that you need to confirm the installation target drive. Click on INSTALLATION DESTINATION.

Since I am using virtual machine. There is only one hard disk which is checked already. If you have more than one hard disk, click to select the disk you want to configure. Click Done on the top left corner.

Once you click "Done", a dialog box will appear. In this dialog box, you can choose to let the system configure the partition for you. You just need to specify the partition scheme. You can also configure the partition manually. For servers it is recommended to use LVM partitions. For desktop we recommends Standard partitions. You can also choose to encrypt the entire partitions. Click Continue when done.

You will be shown the Configuration Summary. Review the summary page and change any setting such as time zone or keyboard. Click Begin Installation when ready.

Once the installation starts, in the meantime, you can set the root password and add user. Click ROOT PASSWORD.

Enter the root password and click Done when ready. Click USER CREATION.

Enter the user name and set the user password. Make sure you check Make this user administrator. Click Done when ready.

Wait for the installation to complete.

Click Reboot on the lower right corner when installation is complete.

The login screen is shown below:
The login screen is shown below:

There is no need to update the computer since all the latest software are downloaded from the server. However, you might want to install addition software. Please refer to Fedora 20 Post Installation Software Configuration Guide.
Note:
Although this procedure show a minimal install using netinstall, you can configure any software packages you want during the pre-installation stage. Please be aware that depending on your bandwidth and the software packages you choose, it may take a long time to complete the installation if you choose to install many software.
*****


Comments
Post a Comment