Posts

Showing posts from May, 2013

Vim Cheat Sheet and Syntax Highlighting

Vim Cheat Sheet Saving and Exiting Vim :wq save changes and exit :q! quit changes and exit :q quit and exit provide no changes :x save changes and exit Moving around lines Use arrow keys to move around For laptop users use hjkl: h left l right k up j down <ctrl>+F page up <ctrl>+B page down e end of the word (forward) b begin of the word (backward) w beging of the word (forward) 0 begin of the line $ end of the line H first line of screen L last line of screen :n goto line number Text Editing i inset before cursor a append after cursor A append to the end of current line o open an new line below cursor and inset C change the rest of current line r replace current character e.g. rd replace current character to d Deletion x delete cha under cursor dw delete word dd delete current line d$ delete the rest of the line form cursor Copy and Paste yy copy current line dd delete current line or cut current line

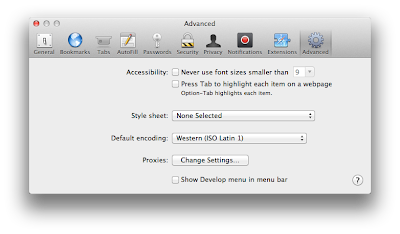
How to Setup Default Zoom in Safari

Image
Create a separate css file as below: body { zoom: 130%; } Save the file as anyfilename.css and place the file in a convenient place. Note: When using the text editor, remember to save the file as plain text file instead of default rich text format. Select "Format" and then select "Make plain text". Also make sure that the file extension is .css instead of .txt On safari, Select Preference >> Advanced Under style sheet select your file *****

Screen Capture on Max OS X

To perform screen capture in Mac OS X use the following keys: Command+Shift+3 - Screen capture the whole desktop Command+Shift+4 - Draw custom screen (A + sign appears and you draw the space you need to capture) Command+Shift+4 then Space - A camera icon appears and you can select which application window you want to capture Note: To copy the screen shot to clipboard add Ctrl such as Command+Shift+Ctrl+3 will capture the entire desktop and save to the clipboard. Use Grab.app Applications The application allows you to display drop down menu and cursor while performing screen capture. To use this app from Finder, select Applications >> Utilities and select the app Grab.app. Under "Capture", you are given various options: Selection, Window, Screen and Time Screen. The first 3 options are similar except that it captures the cursor. The most useful option is Time Screen. Once selected, you are given 10 seconds to select the drop down menu and